

Traditional Jamaican Coconut Gizzada Recipe
Recently, I’ve been obsessed with the Chin Family from Jamaica on TikTok. Granny made her signature Jamaican gizzadas, and it was rawtin—in her voice.
I love seeing a recipe book that’s falling apart but packed with handwritten notes.
Just yesterday, I asked my mom if I could digitize her book of hundreds of Caribbean recipes, but she said no—she’s convinced she wouldn’t be able to find anything once it’s computerized.

| Tool | Why I Love It | Link |
|---|---|---|
| Ammeloo Hybrid | Versatile and perfect for everyday use | Shop Now |
| Cooking Utensils Set | Complete set for easy meal prep | Shop Now |
| Kikcoin Pots & Pans + Baking | Durable, non-stick, great for baking | Shop Now |
Disclosure: Some links are affiliate links. I may earn a small commission at no extra cost to you.
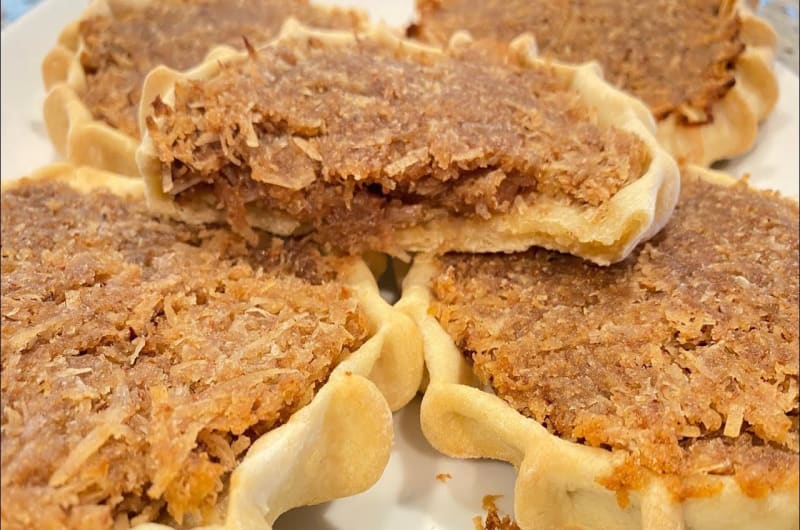
Jamaican Coconut Gizzadas, also known as Pinch Me Around, are a traditional Jamaican pastry with a flaky, pinched-edge crust filled with sweet, spiced grated coconut. Trust me, they’ll become one of your favorite treats.
So today, I’m going to show you how to make a traditional Jamaican coconut gizzada.
What Are Coconut Gizzadas?
Jamaican Coconut Gizzadas, also called a sweet treat made with freshly grated coconut, brown sugar, spices like cinnamon and nutmeg, and a touch of vanilla, sometimes with yellow almond for extra flavor and preservation.
The name just refers to the shape of the pastry. The coconut filling is sweet and moist. When you bake them, the top turns light brown and crispy. My favorite part. This dessert can last a couple of weeks if stored properly.
Ingredients

Coconut Filling:
- Freshly grated coconut – Make sure your coconut is freshly grated. Using old coconut, you can end up with something red, stagnant, and even though it is baked, it will not give off a good flavor.
- Brown sugar – For about four cups or five cups of grated coconut, I usually add 2½ cups of brown sugar.
- Cinnamon powder – You don’t want to put too much cinnamon powder because it will make it too bitter.
- Freshly grated nutmeg – It is a must because it enhances the flavor.
- Vanilla extract – About 2 tablespoons of vanilla.
- Optional yellow almond – Almond preserves it so well and gives it a beautiful flavor.
Pastry:
- Flour
- Butter – Half fat to flour, so if you’re using one pound of flour, you use 8 oz of butter—mostly salted butter.
- Ice-cold water – The ice-cold water is to let the dough keep firm and soft, so it’s easy for you when you’re rolling it up.
- Rolling pin
- Extra flour for rolling surface
Instructions
1. Prepare the Coconut Filling:
Mix the freshly grated coconut with the brown sugar, cinnamon, nutmeg, and vanilla. Stir until everything gets all good in. Mix until the sugar granules are dissolved. You do not want any pieces of the coconut to remain white. Also, I remove any hard pieces at the end.
Let the mixture sit to allow the spices to penetrate. You can do it overnight as long as the temperature in your fridge is cool. But be careful because the coconut gets runny easily.
Make sure of the coconut spread, you want it to have a little since the heat is going to take it and bake it into the shell.
2. Prepare the Pastry:
Cut cold butter into flour using a pastry blender or your hands until it resembles coarse cornmeal. Back in the days, I never had a pastry blender, so I just used my hands. Butter must be firm.
Slowly add ice-cold water, a little at a time, until the dough holds together. You need enough butter for it to have that yellow look. You want the dough to be firm but not too thick.
3. Roll and Shape Pastry Cases:
Roll out the dough. Depending on the size of your pastry cases, you can roll out large or small pieces. Use a rolling pin and a little extra flour to help glide the dough.
Form small pastry cases. Pinch the edges to create the signature ‘Pinch Me Around’ shape. I use my index finger, left hand, thumb, and other index finger to make the first pinch. I give myself another little space. Rotate as you go along. Pinch deep. If it doesn’t hold, pinch again.
Place cases on a greased tray. Your tray must be greased, and no need to prick the bottom; there is no raising agent.
4. Fill Pastry Cases:
Take a portion of the coconut mixture and form it into a ball, then flatten slightly. Spread it to all corners. If any drop down, use your hand to put it back. Do not press down, just fill to the edges.”
Check for gaps and smooth as needed.
5. Bake:
Preheat the oven to 180°C (350–380°F). “If using an electric stove, maybe 400°F. Rotate the tray halfway for even baking.”
Bake for 25–30 minutes until the tops are lightly browned. Some leakage is normal, but it doesn’t matter.
6. Cool and Serve:
Cool in tray for 15 minutes. Cover with plastic wrap if storing.
How To Get The Best Coconut Gizzadas?

We all have been there, where our coconut gizzadas just did not come out right. Here are some of the mistakes I have encountered trying to master my granny’s recipe.
To make perfect Jamaican Coconut Gizzadas, the filling should be moist but not runny. As I mentioned above, the pastry must be chilled and firm before shaping, so you can pinch it easily. When baking, allow the crust to turn a golden brown so the insides can be crispy.
After baking, I wait for it to cool and enjoy it afterward.
Substitution and Variations
Fruit-Infused Coconut Gizzadas: Add finely chopped fruits like pineapple, mango, cherries, or guava to the coconut filling for extra sweetness and a hint of tanginess. Make sure the pieces are small to avoid a runny filling.
Vegan Coconut Gizzadas: Substitute butter in the pastry with vegan butter or coconut oil. Use vegan-friendly sugar to keep it fully plant-based.
Gluten-Free Coconut Gizzadas: Use a gluten-free flour blend for the pastry and ensure all other ingredients are gluten-free. Perfect for those with gluten sensitivities.
Mini Coconut Gizzadas: Make bite-sized versions by using smaller portions of dough and coconut filling. Adjust baking time to ensure even cooking.
Storage Tips for Coconut Gizzadas
- Short-Term (1–3 days): Keep them in an airtight container at room temperature. Choose a cool, dry spot away from direct sunlight. This preserves the flaky crust and keeps the coconut filling moist without turning soggy.
- Medium-Term (up to 2 weeks): Store in the fridge, wrapped in plastic or inside a sealed container. Let them cool completely before wrapping to avoid condensation. The coconut filling holds up well, but the crust may soften slightly.
- Long-Term (up to 2 months): Freeze them individually wrapped in parchment or wax paper, then place in a freezer-safe container or zip bag. To serve, thaw at room temp and reheat in a low oven (around 300°F) for 5–10 minutes to revive the crispness.
Eating Jamaican coconut gizzadas always sends me to my happy place. It is sweet and coconutty on the top but flaky on the bottom.
More Jamaican Recipes
- Easy Jamaican Bully Beef And Rice Recipe
- Quick Jamaican Saltfish And Butter Bean Recipe
- How To Make Jamaican Corned Beef And Cabbage?
Traditional Jamaican Coconut Gizzada Recipe
Course: DessertCuisine: JamaicanDifficulty: Medium12
servings45
minutes30
minutes250
kcalA true Jamaican classic, gizzadas carry the warmth of handwritten recipes and the rhythm of Granny’s kitchen.
Ingredients
Freshly grated coconut
Brown sugar
Cinnamon powder
Freshly grated nutmeg
Vanilla extract
Optional yellow almond
Flour
Butter
Ice-cold water
Rolling pin
Extra flour for rolling surface
Directions
- Mix the freshly grated coconut with the brown sugar, cinnamon, nutmeg, and vanilla. “Stir until everything gets all good in. Mix until the sugar granules are dissolved. You do not want any pieces of the coconut to remain white. Also, I remove any hard pieces at the end.
- Let the mixture sit to allow the spices to penetrate. You can do it overnight as long as the temperature in your fridge is cool. But be careful because the coconut gets runny easily.
- Make sure of the coconut spread, you want it to have a little since the heat is going to take it and bake it into the shell.
- Cut cold butter into flour using a pastry blender or your hands until it resembles coarse cornmeal. “Back in the days, I never had a pastry blender, so I just used my hands. Butter must be firm.
- Slowly add ice-cold water, a little at a time, until the dough holds together. You need enough butter for it to have that yellow look. You want the dough to be firm but not too thick.
- Roll out the dough. Depending on the size of your pastry cases, you can roll out large or small pieces. Use a rolling pin and a little extra flour to help glide the dough.
- Form small pastry cases. Pinch the edges to create the signature ‘Pinch Me Around’ shape. “I use my index finger, left hand, thumb, and other index finger to make the first pinch. I give myself another little space. Rotate as you go along. Pinch deep. If it doesn’t hold, pinch again.
- Place cases on a greased tray. “Your tray must be greased, and no need to prick the bottom; there is no raising agent.
- Take a portion of the coconut mixture and form it into a ball, then flatten slightly. Spread it to all corners. If any drop down, use your hand to put it back. Do not press down, just fill to the edges.”
- Check for gaps and smooth as needed.
- Preheat the oven to 180°C (350–380°F). “If using an electric stove, maybe 400°F. Rotate the tray halfway for even baking.”
- Bake for 25–30 minutes until the tops are lightly browned. “Some leakage is normal but doesn’t matter.
- Cool in tray for 15 minutes. Cover with plastic wrap if storing.
